Why is UW photography different from “Dry” photos?
Well, in most parts it’s the same. Dry photos are more complicated from the point of view that your possible range of settings (for example shutter speed) is much wider. Due to the fact that you can easily use a tripod and shoot an apple on a table allows you to take exposures for much longer than it would ever make sense under water where almost everything is moving. On the other hand, UW is more challenging because you need a flash in most cases and the darkness and movement is putting increased technical requirements on the equipment. On top of that, wildlife photos are challenging for the photographer since the wild life is, well, wild, and does not normally just wait around for you to take a picture. So the speed at which you will need to be able to change the settings on your camera to take a good photo is completely different. Imagine taking a photo of a 2cm small slow-moving nudibranch with your strobes and then you see a shark swimming by that is too far for your flash to reach. You will need to switch of your flash and adjust all the other settings accordingly within a few seconds. So it’s challenging for your equipment as well as for you.
Knowledge is key
The ultimate goal of becoming a better photographer is of course the better picture, but the only path to that better picture is to be able to reliably produce them instead of just having lucky strikes. Luckily, photography is not some kind of black magic. Once someone understands the base principles, it’s much easier to look at a photo and realize what went wrong, change some setting and try again. As long as you need to guess and possibly change several settings every time without knowing what you are doing, you won’t learn anything and just be frustrated with the outcome.
Of course, underwater is not the same as being in a studio. You won’t have endless time to setup your shot when that whale shark swims by you. But then again, the better you know what to do in such a moment instead of guessing will dramatically improve the outcome.
In this article, I will link the most important technical terms to their Wikipedia article in case you want to read more about the technical details.
The basic principle
Light (from whatever source) hits an object (a fish) and gets reflected towards the camera. It enters the lens, the camera opens the shutter and lets image on the sensor. The shutter is closed, the image is recorded. So in essence, it’s a matter of light reaching the sensor. The major questions are:
- How much light is there? Where does it come from?
- How much light do we let on the sensor?
- How do we position the camera?
How does light work?
While I won’t get into the actual physics of light, there are some ways to visualize to help you understand the principles.
- Imagine light as a stream of water:
This is helpful for lenses. There are bigger diameter lenses and smaller ones. Further, lenses have an aperture that can be closed and opened to control the amount of light coming in, like a larger or smaller water hose. The bigger the lens, the more maximum light can “flow” in. A cellphone has a lens opening of maybe 2-3mm. A full-frame lens for a DSLR can have more than 2cm. If there is not enough light coming in through the lens, it will never reach your sensor – no matter how many megapixel it has. - Imagine light as a handful of sand:
This is helpful with image sensors. If you have a 10MP (Megapixel) sensor, i.e. 10 million pixels on your sensor, but you let in only 5millon grains of sand, half of your sensor does not get any light. Or in other words, if you have a camera with a bigger sensor, you also needs more light or a bigger lens to get the same mount of light per pixel of your sensor. Some modern cameras will switch combine sensor pixels for low light photography to compensate for this issue. This halves the resolution however.
Controlling the light: Aperture
There are various ways to control the light and each of them influence the image in a different way. Let’s assume – to keep it simpler for the start – that we do not have a flash. So let’s start as the light moves, with the lens first. As described above, we can imagine the light flowing onto the lens like a stream of water. The bigger the opening, the more light can come in while the shutter is open. This is controlled by the aperture. Larger lenses have a wider maximum aperture.
However, using a wider aperture also changes the way your image looks. Look at this graphic:
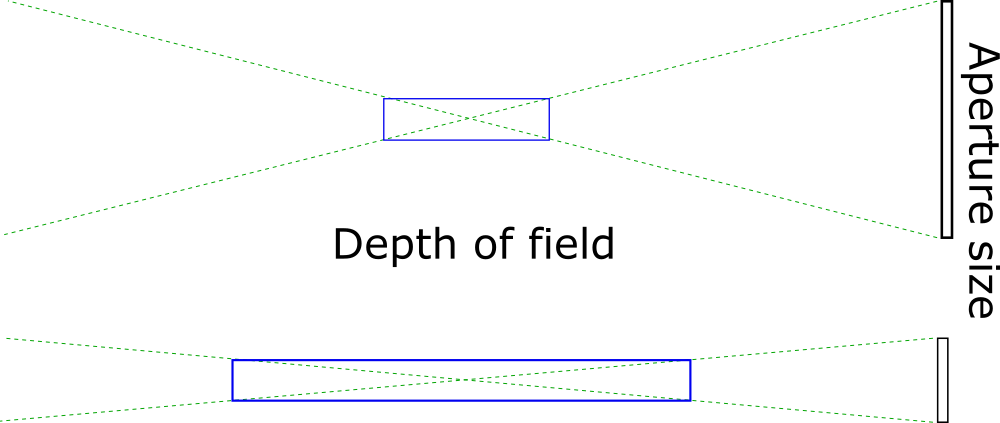 On the top, there is an example of a wide aperture, on the bottom a narrow one. The light reaches the camera from the object we want to take a photo of (the green lines). The sharpest focus will be at the intersection of the green lines and up to a certain distance of the lines, the image will be still reasonably sharp for our eyes. In both aperture examples, I marked an area of the same height (i.e. the same sharpness) with a blue box.
As you can see, the wider aperture has a much narrower area where the image will be sharp. This is called Depth of Field (DOF). Depending on the image subject, you will want to have a shallow or deep DOF.
The aperture which controls the DOF is indicated with an “f” and a number. The number usually ranges from f1.4 to f22. Confusingly a larger number indicates a smaller aperture. The maximum possible (i.e. widest) aperture of a lens usually ranges from f1.4 until f5.6). The narrowest is usually f22 for all lenses.
What to use when?
If there is not a lot of light, you will need the wider aperture, otherwise the image will simply be too dark. Even if there is a lot of light, you might want to use the wider aperture, because the object will look better if the background is blurred. Here are two images if Bumphead parrot fish with natural light.
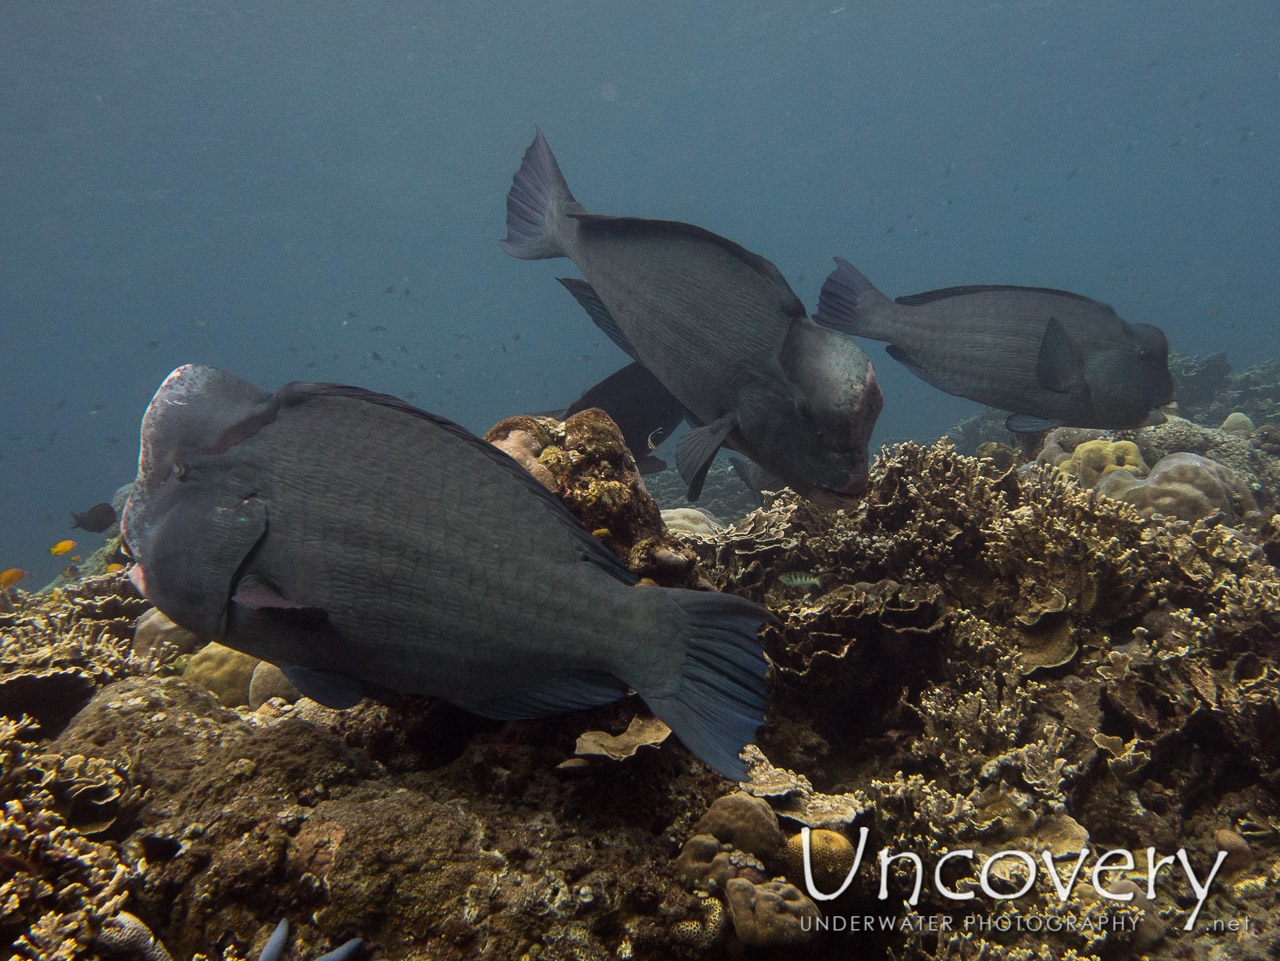
This image has a narrow aperture (f5.6). The depth of field is quite deep and this is why you can see all three fish relatively sharp.

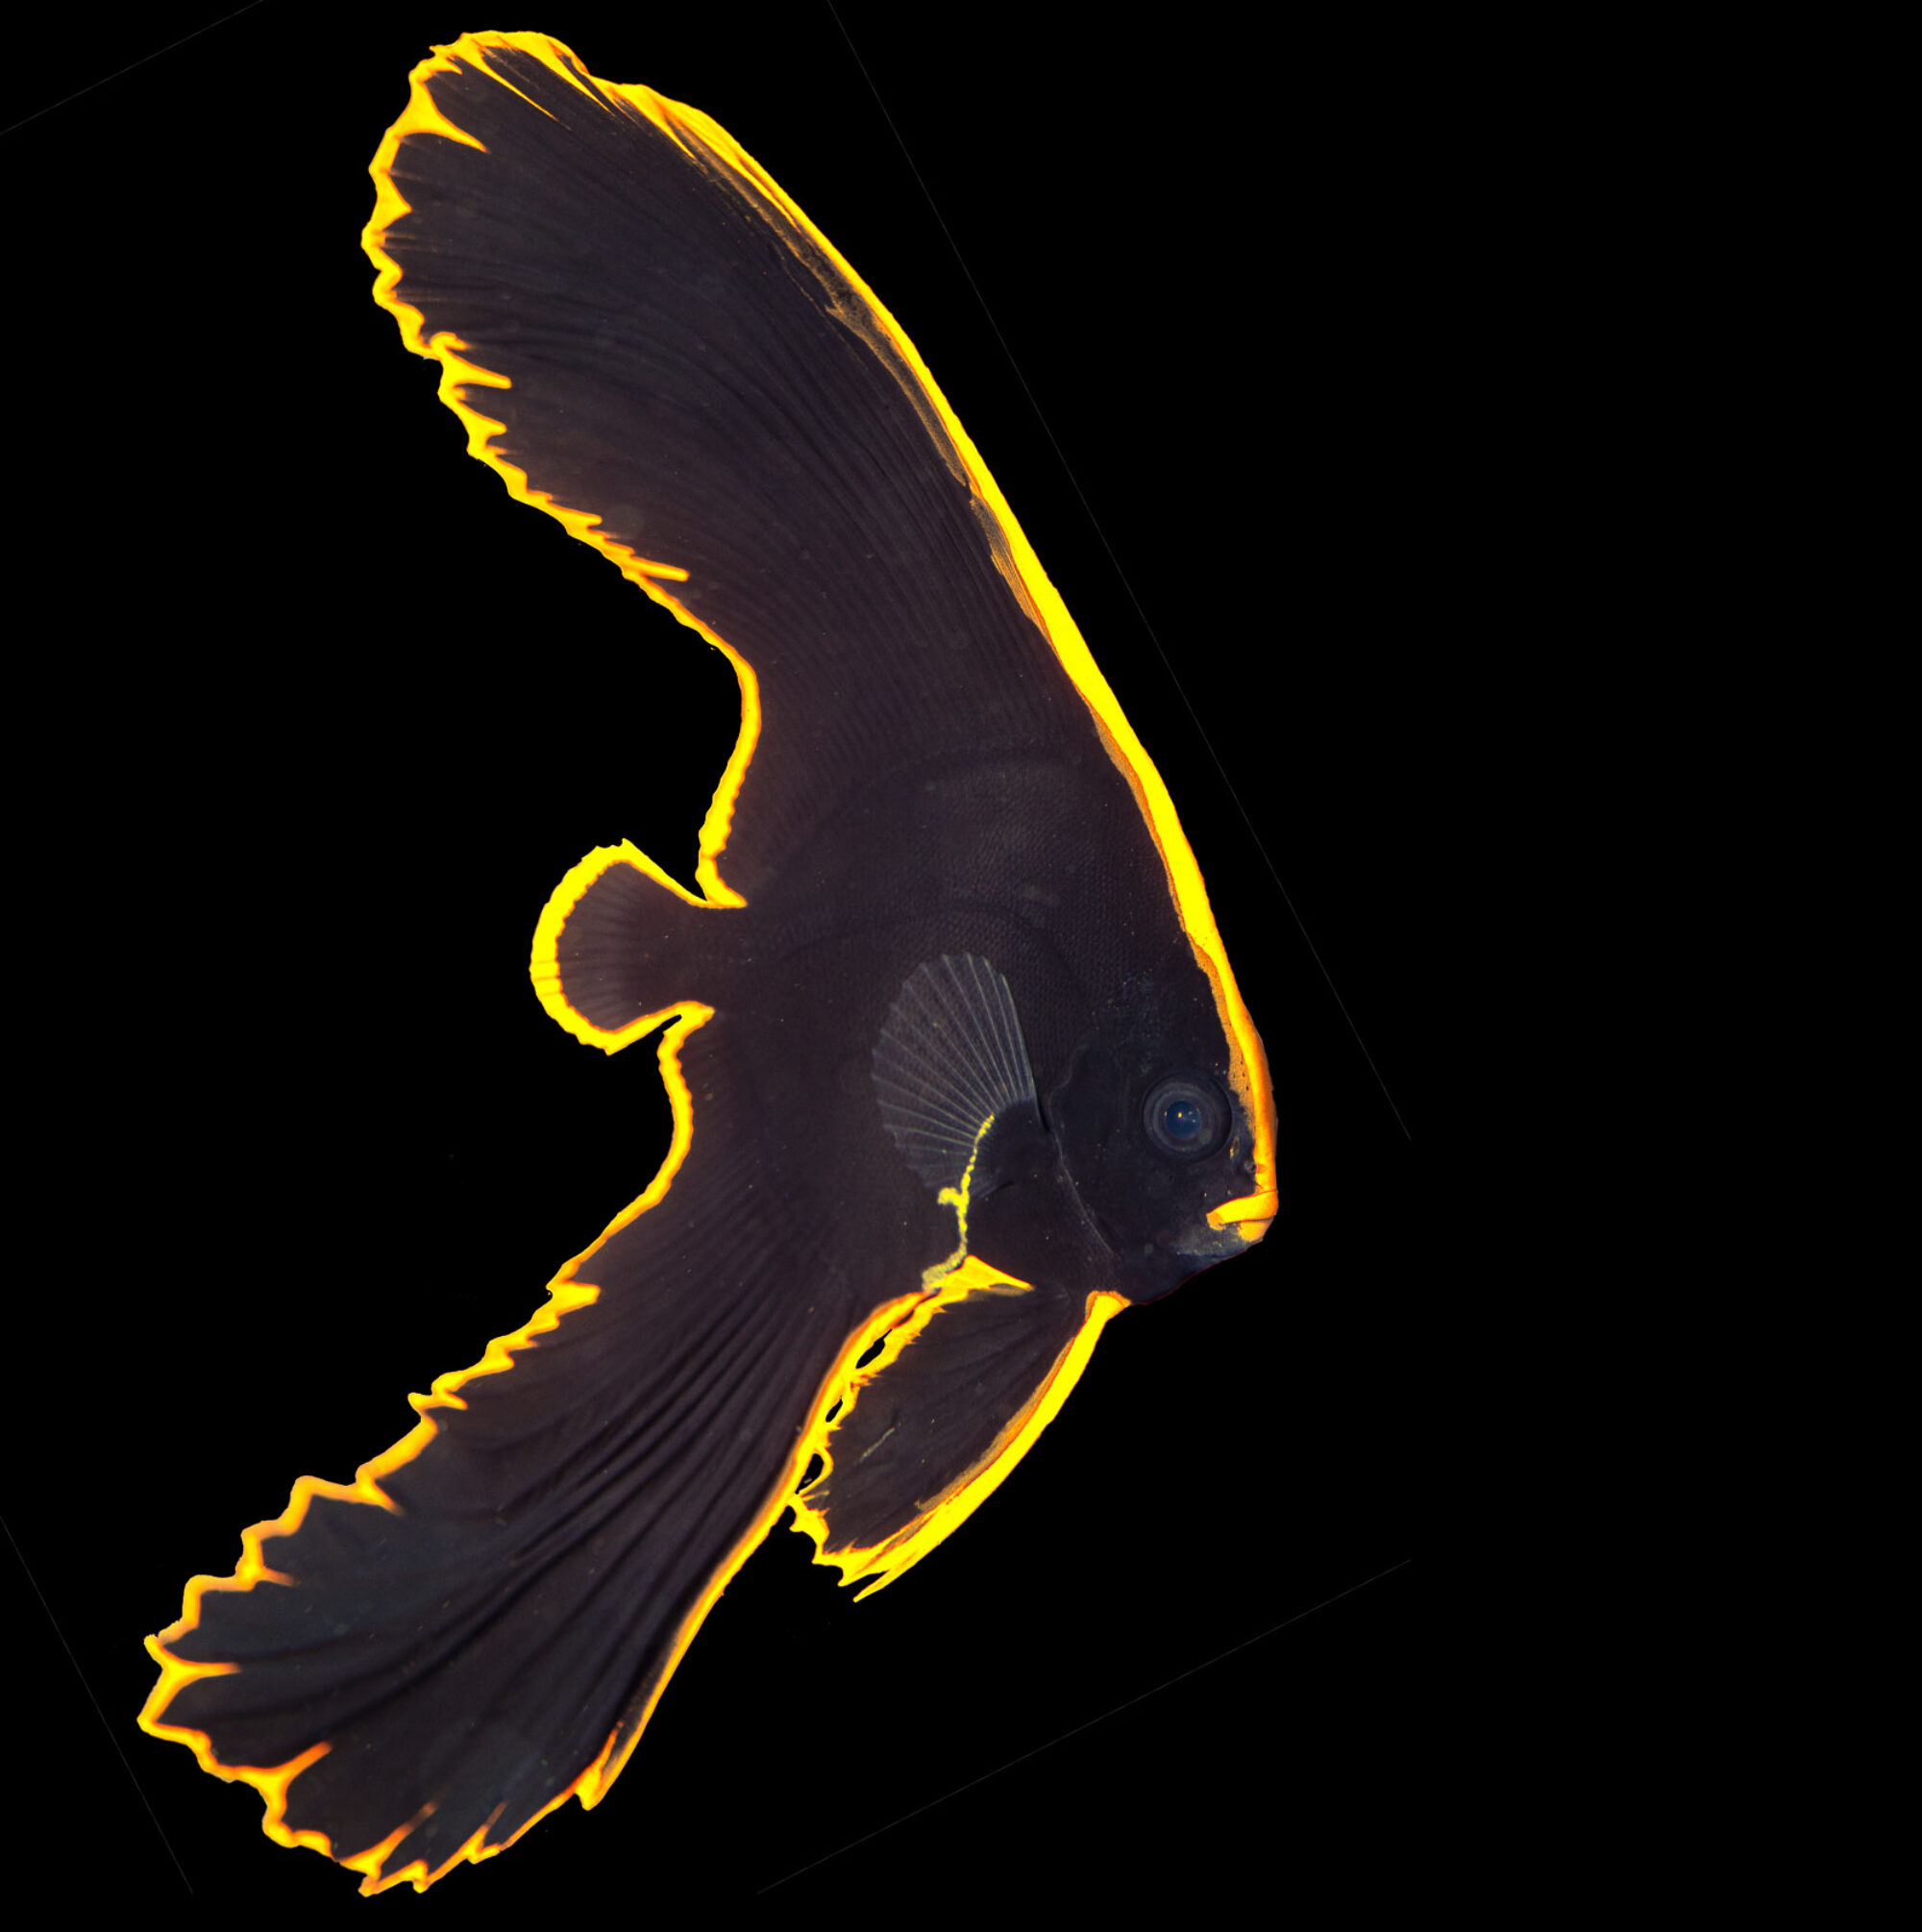
This image has a very wide aperture (f1.8) and this makes the foreground and background blurry. The fish seems to pop out of the image and the eye is less distracted by it. There is a risk however that not even the whole subject is in focus, specially when the subject is very close to the camera:
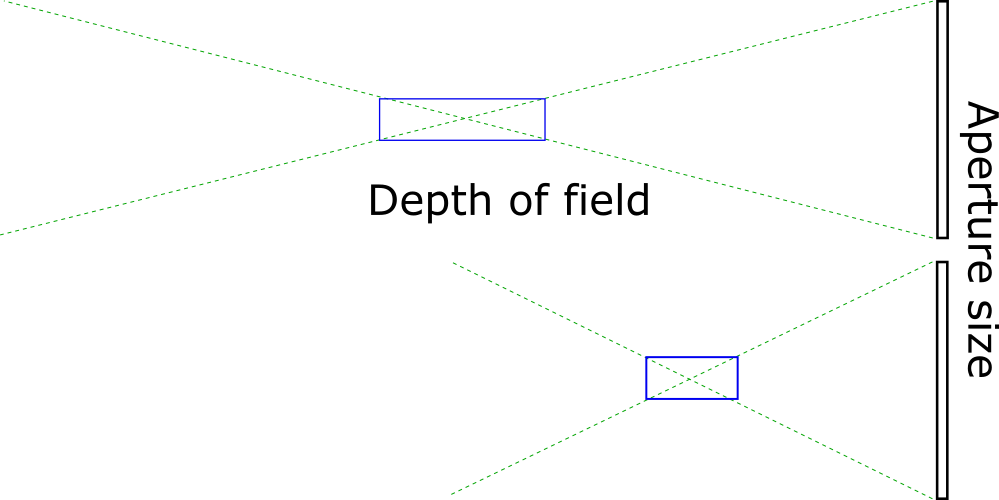
As you can see from the above diagram, with the same aperture, when focusing on an object closer to the camera, the depth of field is getting narrower. Specially small, but elongated subjects like pipe fish are hard to get into focus at low light:
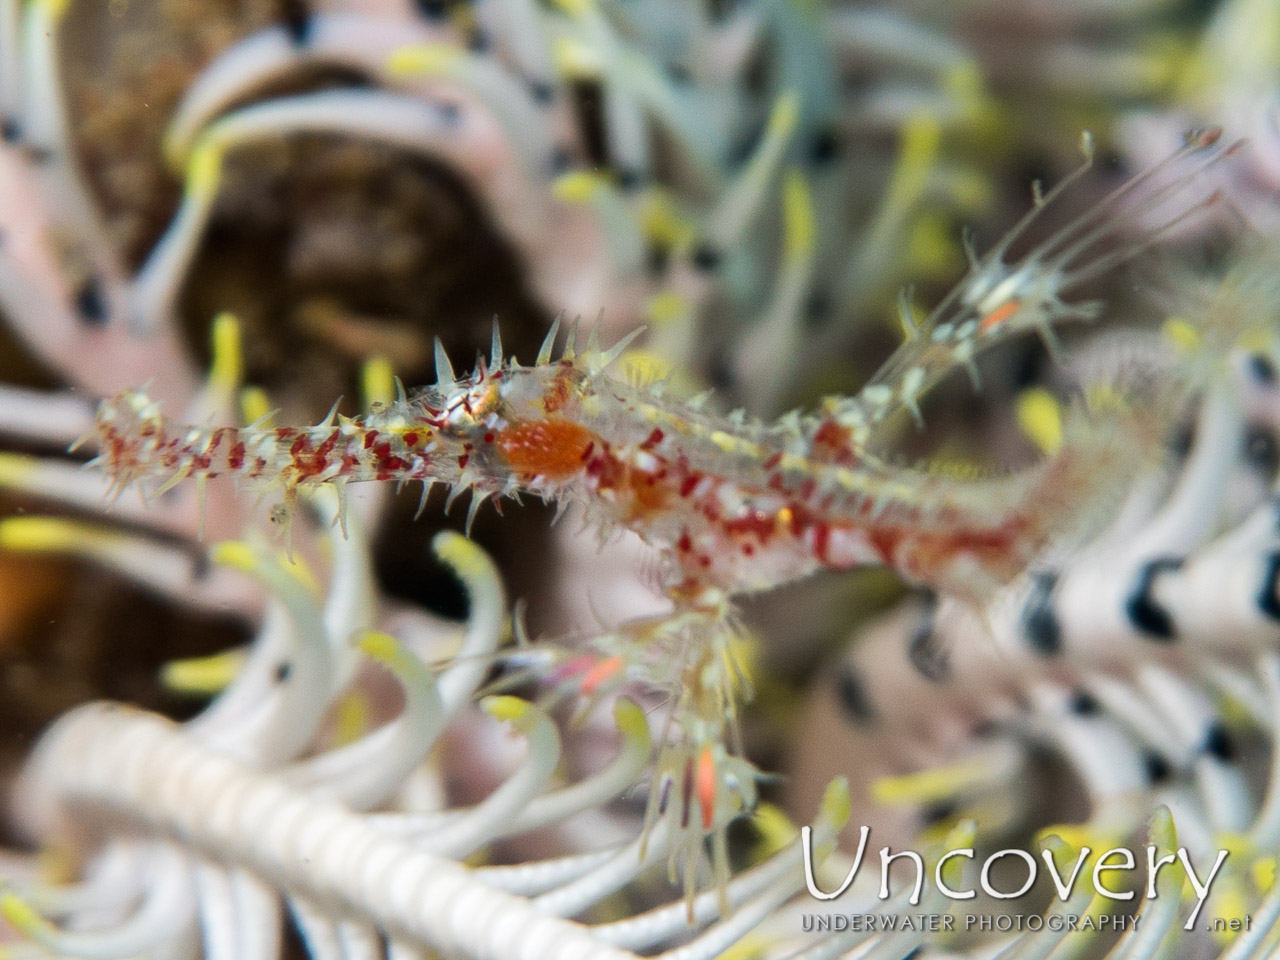
This image has an aperture of f5.6, so the same as the first image above with the deeper depth of field. So at a distance, the depth of field ranged several meters, but close-up, it was not even enough to get a 5cm long fish into focus.
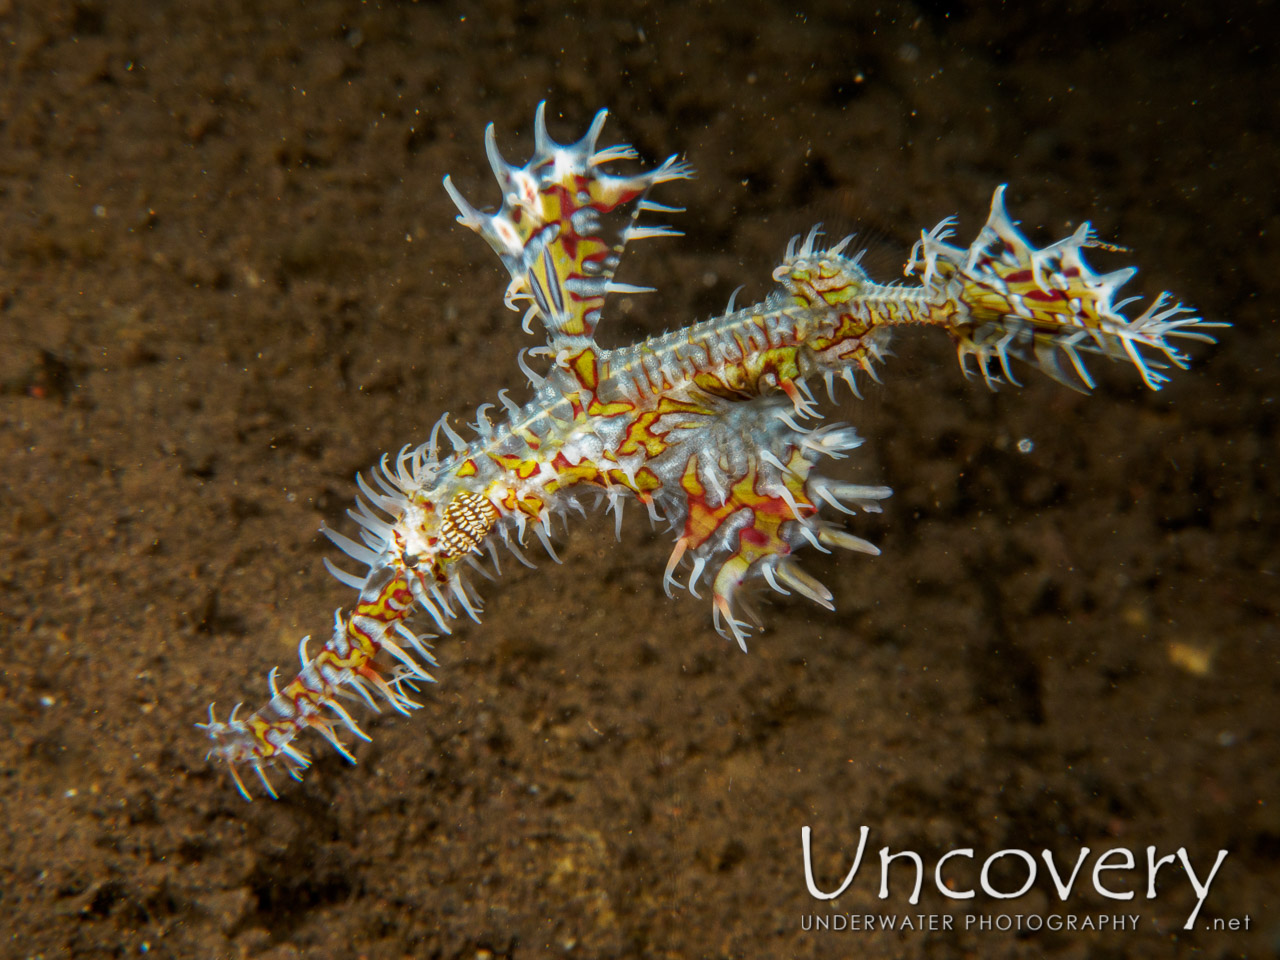
This image has an aperture of f22 to guarantee that the whole fish is in focus. It was possible because I use a strong flash that has no issues illuminating an object so close to the camera. However, you can see that the background is also quite recognizable. Luckily, in this image, the background is not very distracting so it does not matter.
Variable vs. fixed maximum Aperture
Most zoom lenses change their maximum aperture when you zoom in. A lens will have the maximum aperture indicated on the model. So a standard zoom lens might have an aperture of f3.5-5.6. That means that at the maximum wide angle setting, it has a maximum aperture of f3.5 and when zooming in fully that reduces to f5.6. So be aware that getting a shallow depth of field or enough light will be always more challenging when you zoom in on your lens. There are some more expensive lenses where the aperture is constant f2.8 throughout all zoom factors, but those are usually limited to DSLR cameras.
The creative choice
While the narrow DOF helps to distinguish the fish from the relatively distracting background, it also prevents us from having the whole animal in focus. What the image is supposed to look like, is anyone’s own choice. You can narrow the focus to the eyes in order to blur and therefore hide the background even more. You can shrink the aperture further and increase the DOF so that the whole fish is in focus but that will also make the background even more visible than above. Ideally, you take 2-3 shots with varying aperture and then pick what you like. The main issue will be that to use a wider aperture, you also will need more light.
Continue reading in Part 2.